This project is a Step Counter that tracks steps with an Adafruit ADXL345 accelerometer sensor. The step count is displayed on an Adafruit SSD1306 OLED screen, and a web server allows remote monitoring and step count reset. It’s a versatile solution for tracking physical activity that can be easily customized for a variety of applications.
How it works?
Here’s Projects Working in Steps:
- The Adafruit ADXL345 accelerometer sensor continually detects acceleration data.
- When a significant change in acceleration is detected (indicating a step), the step count is increased.
- The current step count is presented in real time on an Adafruit SSD1306 OLED screen.
- A web server is set up to provide remote access to the step count and offers the option to reset it.
- A debounce system avoids incorrect step detection by creating a delay between consecutive steps, ensuring precise step counting.
Components Required
- ESP32
- ADXL345 Accelerometer Sensor
- 0.96 inch OLED Display
Introduction to ADXL345 Accelerometer Sensor
The ADXL345 is a flexible 3-axis accelerometer sensor that measures acceleration in three dimensions precisely. It has high resolution (up to 13-bit), a wide range of sensitivity options, and low power consumption, making it perfect for motion, tilt, and vibration detection in a variety of applications. This sensor can communicate through I2C or SPI so it is suitable for use in microcontroller-based projects.
Pinout of ADXL345
This is a pinout diagram of ADXL345 Sensor
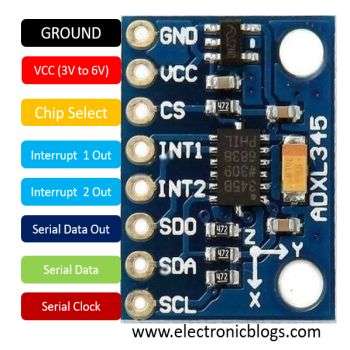
| Pin Name | Pin Description |
| GND | Ground Pin |
| VCC | Power Supply (3V to 6V) |
| CS | Chip Select Pin |
| INT1 | Interrupt 1 Output Pin |
| INT2 | Interrupt 2 Output Pin |
| SDO | Serial Data Output Pin |
| SDA | Serial Data Input & Output |
| SDL | Serial Communication Clock |
Circuit Diagram
This is a simple circuit diagram of Step Counter.

| OLED Pin | ESP32 Pin |
| VCC | 3V3 Pin |
| GND | GND of ESP32 |
| SDA | GPIO21 |
| SCL | GPIO22 |
| ADXL Pin | ESP32 Pin |
| VCC | 3V3 Pin |
| GND | GND of ESP32 |
| SDA | GPIO21 |
| SCL | GPIO22 |
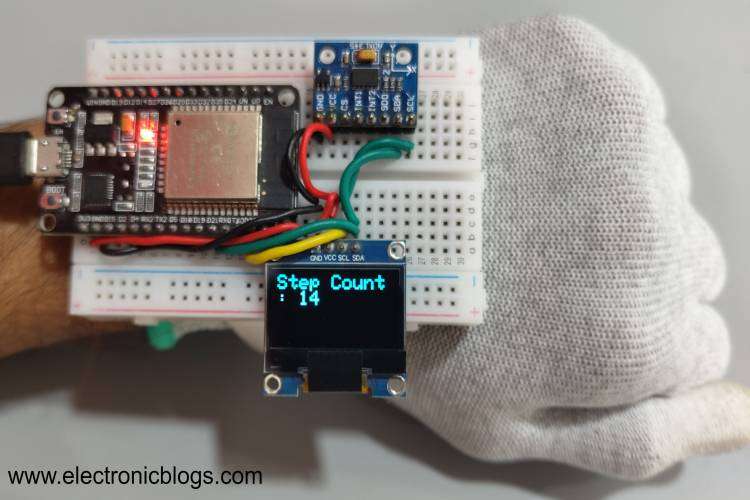
Physical Connections
This is a physical connection diagram. We used breadboard to connect the OLED and ADXL345 with ESP32.
Webserver
This is how our webserver looks like.

Program/Code:
#include <Wire.h>
#include <Adafruit_Sensor.h>
#include <Adafruit_ADXL345_U.h>
#include <WiFi.h>
#include <WebServer.h>
#include <Adafruit_GFX.h>
#include <Adafruit_SSD1306.h>

#define SCREEN_WIDTH 128
#define SCREEN_HEIGHT 64
#define OLED_RESET -1

Adafruit_ADXL345_Unified accel = Adafruit_ADXL345_Unified(12345);
Adafruit_SSD1306 display(SCREEN_WIDTH, SCREEN_HEIGHT, &Wire, OLED_RESET);

const float threshold = 1.2; // Adjust this threshold for step detection sensitivity
const int bufferLength = 15; // Number of accelerometer readings in the buffer
float buffer[bufferLength];
int bufferIndex = 0;
int stepCount = 0;
bool stepDetected = false;

const unsigned long debounceDelay = 300; // Debounce delay in milliseconds
unsigned long lastStepTime = 0;

const char* ssid = "SSID";
const char* password = "PASSWORD";

WebServer server(80);

void handleRoot() {
  String html = "<!DOCTYPE html><html><head><title>Step Counter</title><style>body{font-family: Arial, sans-serif;background-color: #f9f9f9;margin: 0;padding: 0;}#container{width: 300px;margin: 50px auto;padding: 20px;background-color: #ffffff;border-radius: 10px;box-shadow: 0 4px 8px rgba(0, 0, 0, 0.1);}h1{text-align: center;color: #333333;}.info{text-align: center;font-size: 24px;color: #555555;margin-bottom: 20px;}.btn{display: block;width: 100%;padding: 10px;text-align: center;color: #ffffff;background-color: #007bff;border: none;border-radius: 5px;font-size: 18px;cursor: pointer;transition: background-color 0.2s ease;}.btn:hover{background-color: #0056b3;}#footer{text-align: center;color: #888888;position: fixed;bottom: 20px;left: 0;right: 0;}</style></head><body><div id=\"container\"><h1>Step Counter</h1><p class=\"info\">Step count: <span id=\"step-count\">" + String(stepCount) + "</span></p><button class=\"btn\" onclick=\"resetCount()\">Reset Count</button></div><div id=\"footer\"><p>IP Address: <span id=\"ip-address\">Loading...</span></p></div><script>function updateStepCount(count){document.getElementById(\"step-count\").innerText=count;}function updateIpAddress(ip){document.getElementById(\"ip-address\").innerText=ip;}function resetCount(){var xhr=new XMLHttpRequest();xhr.open(\"GET\",\"/reset\",true);xhr.onreadystatechange=function(){if(xhr.readyState==4&&xhr.status==200){var response=JSON.parse(xhr.responseText);updateStepCount(response.stepCount);}};xhr.send();}function getIpAddress(){var xhr=new XMLHttpRequest();xhr.open(\"GET\",\"https://api.ipify.org?format=json\",true);xhr.onreadystatechange=function(){if(xhr.readyState==4&&xhr.status==200){var response=JSON.parse(xhr.responseText);updateIpAddress(response.ip);}};xhr.send();}window.onload=function(){getIpAddress();setInterval(function(){location.reload();}, 5000);};</script></body></html>";
  server.send(200, "text/html", html);
}

void handleReset() {
  stepCount = 0;
  String response = "{\"stepCount\":" + String(stepCount) + "}";
  server.send(200, "application/json", response);
}

void updateOledDisplay() {
  display.clearDisplay();
  display.setTextSize(2);
  display.setTextColor(SSD1306_WHITE);
  display.setCursor(0, 0);
  display.print("Step Count: ");
  display.print(stepCount);
  display.display();
}

void setup() {
  Serial.begin(115200);
  Wire.begin();

  if (!accel.begin()) {
    Serial.println("Could not find a valid ADXL345 sensor, check wiring!");
    while (1);
  }

  accel.setRange(ADXL345_RANGE_16_G);

  display.begin(SSD1306_SWITCHCAPVCC, 0x3C);
  display.display();
  delay(2000);
  display.clearDisplay();

  WiFi.begin(ssid, password);
  while (WiFi.status() != WL_CONNECTED) {
    delay(1000);
    Serial.println("Connecting to WiFi...");
  }
  Serial.println("Connected to WiFi");
  Serial.print("IP Address: ");
  Serial.println(WiFi.localIP());

  server.on("/", HTTP_GET, handleRoot);
  server.on("/reset", HTTP_GET, handleReset);
  server.begin();

  delay(2000); // Pause for 2 seconds
}

void loop() {
  server.handleClient();

  sensors_event_t event;
  accel.getEvent(&event);

  float accelerationX = event.acceleration.x;
  float accelerationY = event.acceleration.y;
  float accelerationZ = event.acceleration.z;

  float accelerationMagnitude = sqrt(accelerationX * accelerationX +
                                     accelerationY * accelerationY +
                                     accelerationZ * accelerationZ);

  buffer[bufferIndex] = accelerationMagnitude;
  bufferIndex = (bufferIndex + 1) % bufferLength;

  // Detect a step if the current magnitude is greater than the average of the buffer by the threshold
  float avgMagnitude = 0;
  for (int i = 0; i < bufferLength; i++) {
    avgMagnitude += buffer[i];
  }
  avgMagnitude /= bufferLength;

  unsigned long currentMillis = millis();

  if (accelerationMagnitude > (avgMagnitude + threshold)) {
    if (!stepDetected && (currentMillis - lastStepTime) > debounceDelay) {
      stepCount++;
      stepDetected = true;
      lastStepTime = currentMillis;

      Serial.println("Step detected!");
      Serial.print("Step count: ");
      Serial.println(stepCount);

      // Update OLED display with step count
      updateOledDisplay();
    }
  } else {
    stepDetected = false;
  }
}
Program Explanation
Library and Sensor/Display Setup:
#include <Wire.h>
#include <Adafruit_Sensor.h>
#include <Adafruit_ADXL345_U.h>
#include <WiFi.h>
#include <WebServer.h>
#include <Adafruit_GFX.h>
#include <Adafruit_SSD1306.h>
These lines include necessary libraries for communication, sensor handling, Wi-Fi connectivity, web server functionality, and OLED display control.
Sensor and Display Initialization:
Adafruit_ADXL345_Unified accel = Adafruit_ADXL345_Unified(12345);
Adafruit_SSD1306 display(SCREEN_WIDTH, SCREEN_HEIGHT, &Wire, OLED_RESET);
These lines initialise the Adafruit ADXL345 accelerometer sensor and the Adafruit SSD1306 OLED display with appropriate parameters.
Constants and Variables:
const float threshold = 1.2; // Threshold for step detection sensitivity
const int bufferLength = 15; // Number of accelerometer readings in the buffer
float buffer[bufferLength];
int bufferIndex = 0;
int stepCount = 0;
bool stepDetected = false;

const unsigned long debounceDelay = 300; // Debounce delay in milliseconds

const char* ssid = "SSID";
const char* password = "PASSWORD";
These lines define variables and constants used for step detection, debounce control, and Wi-Fi network credentials.
Web Server Initialization:
WebServer server(80);A WebServer instance is established to handle HTTP requests on port 80.
Root URL Handler:
void handleRoot() {
  // HTML code to create a web page displaying step count and a reset button
  // ...
  server.send(200, "text/html", html);
}
When visitors access the root URL (“/”), the handleRoot function provides an HTML page with the step count and a reset button.
Reset URL Handler:
void handleReset() {
  stepCount = 0;
  // JSON response with the updated step count
  // ...
  server.send(200, "application/json", response);
}
When the “/reset” URL is requested, the handleReset function resets the step count and returns a JSON response with the updated count.
OLED Display Update Function:
void updateOledDisplay() {
  // Clear the OLED display and update step count display
  // ...
  display.display();
}
The function updateOledDisplay clears the OLED display and replaces it with the current step count.
Setup Function:
void setup() {
  // Initialize serial communication, I2C, and check sensor connectivity
  // ...

  // Set sensor range and initialize OLED display
  // ...

  // Connect to Wi-Fi
  // ...

  // Configure web server routes and start the server
  // ...

  delay(2000); // Pause for 2 seconds
}- In the setup function, serial communication, I2C, and sensor connectivity are initialized.
- The sensor’s range is set, the OLED display is initialized, and Wi-Fi is connected.
- Web server routes for root and reset requests are configured, and the server is started.
Loop Function:
void loop() {
  // Handle incoming HTTP requests via the web server
  // ...

  // Read accelerometer data and perform step detection
  // ...

  // Update OLED display with step count
  // ...
}- The web server handles incoming HTTP requests in the loop function.
- Accelerometer data is read, and step detection logic is performed.
- The OLED display is updated with the current step count.
Conclusion
Finally, this project creates a step counter by combining an ESP32 microcontroller with an ADXL345 accelerometer sensor. It monitors the step count in real time via a web interface, and the step count is displayed on an OLED display. The project demonstrates how sensor data, Wi-Fi connectivity, and web server capability can be combined to create a useful fitness monitoring application.
More ESP32 Projects Articles:
ESP32 Project :Alcohol Sensor Web Server