This article describes a hands-on project that uses an ESP32 microcontroller to create a local web server-based knock sensor system. With this configuration, you can simply detect knocks in your surroundings and examine their status in real-time using a web interface on devices connected to your local network. It’s a simple yet useful application of IoT technology that we’ll go through in depth. In IOT ESP32 Projects plays very important role so lets get started.
How it works?
The project includes an ESP32 connected to a knock sensor. When the sensor detects a knock, it flashes the integrated LED. The ESP32 acts as a local web server, providing a webpage accessible on the same network. This webpage displays the current status of the knock sensor, telling you if a knock has happened or not.
Components Required
- ESP32
- Knock Sensor(KY-031)
Introduction to knock sensor KY-031
The KY-031 Knock Sensor module is a vibration sensor that detects and transmits knocks and taps. This module is made up of a spring-based sensor, a 10 k resistor, and three male header pins. When a vibration occurs, the spring emits a loud signal. This module’s spring-based sensor emits a HIGH signal when it detects vibration. It can be used in a wide range of security and monitoring systems. It is compatible with both the Arduino board and any other microcontroller.
Pinout of Knock Sensor(KY-031)
This is a pinout of KY-031 Sensor
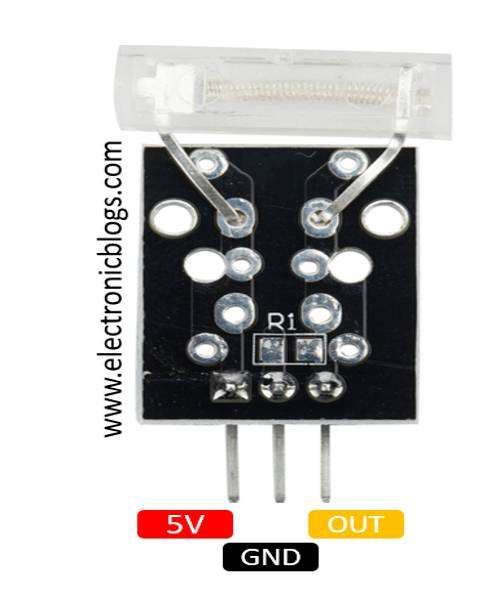
| Pin Name | Pin Description |
| VCC | Power Supply (3V to 6V) |
| GND | Ground Pin |
| OUT | Signal Output Pin |
Circuit Diagram
This is a Circuit Diagram of knock sensor webserver.
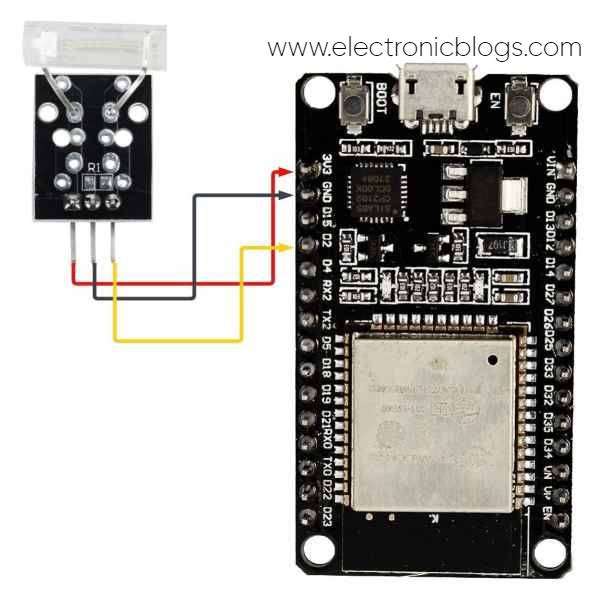
| Knock Sensor Pin | ESP32 Pin |
| VCC | 3V3 Pin |
| GND | GND of ESP32 |
| OUT | GPIO2 |
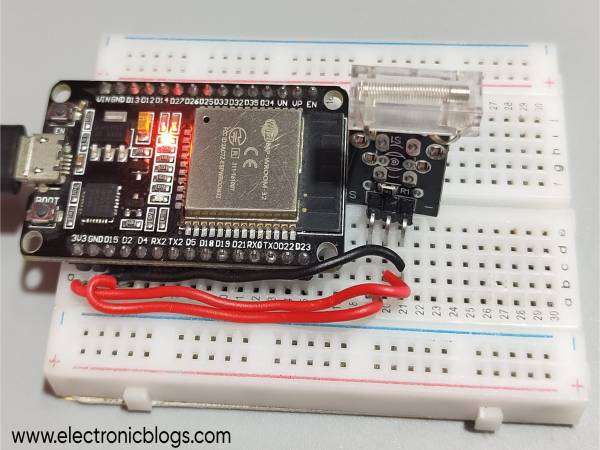
Physical Connections
This is a physical connection image of knock sensor webserver using esp32 and KY-031 sensor.
Program/Code:
#include <WiFi.h>
#include <AsyncTCP.h>
#include <ESPAsyncWebServer.h>

const char* ssid = "SSID";
const char* password = "PASSWORD";

const int knockPin = 2;  // GPIO2 for the knock sensor
const int ledPin = 13;   // Built-in LED on GPIO13

int knockDetected = 0;
unsigned long knockTime = 0;
const unsigned long knockDisplayTime = 2000;  // 2 seconds

AsyncWebServer server(80);

void setup() {
  pinMode(ledPin, OUTPUT);
  pinMode(knockPin, INPUT);

  // Connect to Wi-Fi
  Serial.begin(115200);
  WiFi.begin(ssid, password);
  while (WiFi.status() != WL_CONNECTED) {
    delay(1000);
    Serial.println("Connecting to WiFi...");
  }
  Serial.println("Connected to WiFi");

  // Print ESP32 IP address to Serial Monitor
  Serial.print("ESP32 IP address: ");
  Serial.println(WiFi.localIP());

  // Route for the web interface
  server.on("/", HTTP_GET, [](AsyncWebServerRequest *request){
    String statusColor = knockDetected ? "green" : "red";
    String statusText = knockDetected ? "Knock Detected" : "No Knock Detected";
    String html = "<html><head><style> \
                  .container { \
                    text-align: center; \
                  } \
                  .status-box { \
                    width: 200px; \
                    height: 100px; \
                    background-color: " + statusColor + "; \
                    text-align: center; \
                    margin: 0 auto; \
                    padding: 20px; \
                    color: white; \
                    font-size: 20px; \
                  } \
                  </style><script> \
                  function updateStatus() { \
                    var xhr = new XMLHttpRequest(); \
                    xhr.onreadystatechange = function() { \
                      if (xhr.readyState == 4 && xhr.status == 200) { \
                        document.getElementById('status').innerHTML = xhr.responseText; \
                      } \
                    }; \
                    xhr.open('GET', '/status', true); \
                    xhr.send(); \
                  } \
                  setInterval(updateStatus, 1000); \
                  </script></head><body> \
                  <div class='container'> \
                    <h1>Knock Sensor Status</h1> \
                    <div class='status-box' id='status'>" + statusText + "</div> \
                    <p>ESP32 IP Address: " + WiFi.localIP().toString() + "</p> \
                  </div> \
                  </body></html>";
    request->send(200, "text/html", html);
  });

  // Route to check knock status
  server.on("/status", HTTP_GET, [](AsyncWebServerRequest *request){
    String status = knockDetected ? "Knock Detected" : "No Knock Detected";
    request->send(200, "text/plain", status);
  });

  // Start server
  server.begin();

  Serial.println("Server started");
}

void loop() {
  int sensorValue = digitalRead(knockPin);
  if (sensorValue == HIGH) {
    digitalWrite(ledPin, HIGH);
    knockDetected = 1;
    knockTime = millis();  // Record the time of the knock
  } else {
    digitalWrite(ledPin, LOW);
    if (knockDetected && (millis() - knockTime >= knockDisplayTime)) {
      knockDetected = 0;  // Reset the status after 2 seconds
    }
  }
  delay(100);  // Adjust the delay as needed
}
Program Explanation
Library Inclusions:
#include <WiFi.h>
#include <AsyncTCP.h>
#include <ESPAsyncWebServer.h>
These lines include Wi-Fi communication libraries as well as asynchronous web server functions.
Network Configuration:
const char* ssid = "SSID";
const char* password = "PASSWORD";
These lines configure the ESP32’s network credentials (SSID and password) for connecting to a Wi-Fi network.
Pin Definitions:
const int knockPin = 2;  // GPIO2 for the knock sensor
const int ledPin = 13;   // Built-in LED on GPIO13
These lines define the GPIO Pins for the knock sensor and the built-in LED.
Variable Initialization:
int knockDetected = 0;
unsigned long knockTime = 0;
const unsigned long knockDisplayTime = 2000;  // 2 seconds
These variables monitor the state of knock detection and keep track of when the last knock occurred. knockDisplayTime specifies the time window in which the knock status will be displayed.
Server Initialization:
AsyncWebServer server(80);This line configures the web server object to listen on port 80 for HTTP requests.
Setup Function:
void setup() {
  pinMode(ledPin, OUTPUT);
  pinMode(knockPin, INPUT);

  // Connect to Wi-Fi
  Serial.begin(115200);
  WiFi.begin(ssid, password);
  while (WiFi.status() != WL_CONNECTED) {
    delay(1000);
    Serial.println("Connecting to WiFi...");
  }
  Serial.println("Connected to WiFi");

  // Print ESP32 IP address to Serial Monitor
  Serial.print("ESP32 IP address: ");
  Serial.println(WiFi.localIP());

  // Route for the web interface
  server.on("/", HTTP_GET, [](AsyncWebServerRequest *request){
    String statusColor = knockDetected ? "green" : "red";
    String statusText = knockDetected ? "Knock Detected" : "No Knock Detected";
    String html = "<html><head><style> \
                  .container { \
                    text-align: center; \
                  } \
                  .status-box { \
                    width: 200px; \
                    height: 100px; \
                    background-color: " + statusColor + "; \
                    text-align: center; \
                    margin: 0 auto; \
                    padding: 20px; \
                    color: white; \
                    font-size: 20px; \
                  } \
                  </style><script> \
                  function updateStatus() { \
                    var xhr = new XMLHttpRequest(); \
                    xhr.onreadystatechange = function() { \
                      if (xhr.readyState == 4 && xhr.status == 200) { \
                        document.getElementById('status').innerHTML = xhr.responseText; \
                      } \
                    }; \
                    xhr.open('GET', '/status', true); \
                    xhr.send(); \
                  } \
                  setInterval(updateStatus, 1000); \
                  </script></head><body> \
                  <div class='container'> \
                    <h1>Knock Sensor Status</h1> \
                    <div class='status-box' id='status'>" + statusText + "</div> \
                    <p>ESP32 IP Address: " + WiFi.localIP().toString() + "</p> \
                  </div> \
                  </body></html>";
    request->send(200, "text/html", html);
  });

  // Route to check knock status
  server.on("/status", HTTP_GET, [](AsyncWebServerRequest *request){
    String status = knockDetected ? "Knock Detected" : "No Knock Detected";
    request->send(200, "text/plain", status);
  });

  // Start server
  server.begin();

  Serial.println("Server started");
}
The setup() function contains the initial configuration and setup steps.
- Pin Configuration: Sets ledPin to be an output and knockPin to be an input.
- Wi-Fi Connection: Starts serial communication, connects to the selected Wi-Fi network, and waits for it to establish. The IP address of the ESP32 is then printed.
- Web Interface Setup: Defines web interface routes using the ESPAsyncWebServer module. It generates an HTML page that displays the knock sensor’s status as well as the IP address of the ESP32. The status is updated every second on the page.
- Server Start: Starts the web server and prints a “Server started” message to the Serial Monitor.
Loop Function:
void loop() {
  int sensorValue = digitalRead(knockPin);
  if (sensorValue == HIGH) {
    digitalWrite(ledPin, HIGH);
    knockDetected = 1;
    knockTime = millis();  // Record the time of the knock
  } else {
    digitalWrite(ledPin, LOW);
    if (knockDetected && (millis() - knockTime >= knockDisplayTime)) {
      knockDetected = 0;  // Reset the status after 2 seconds
    }
  }
  delay(100);  // Adjust the delay as needed
}
The loop() function handles continuous operations.
- Knock Detection: Reads the knock sensor’s condition. If a knock is detected (HIGH state), it lights the LED, records the time of the knock, and sets the knockDetected flag to 1. If there are no more knocks for 2 seconds (knockDisplayTime), the status is reset to 0.
- Delay: Introduces a 100 ms delay to control the loop’s execution speed. You can adjust this delay as needed.
Conclusion
Finally, this project successfully shows how to use an ESP32 microcontroller to build a local web server for monitoring a knock sensor. It demonstrates a practical application of IoT technology by providing a simple way to detect and visualize knocks in real time via a web interface.