
Explore a project that uses the ESP32 microcontroller and an alcohol sensor to create a local web server for real-time monitoring of alcohol levels. This configuration allows users to check alcohol levels via a web interface, giving a simple solution for responsible alcohol monitoring.
How it works?
This project creates a local web server with an ESP32 and an alcohol sensor. It continuously measures alcohol levels and provides real-time monitoring via a web interface, allowing users to verify the current alcohol level in their local network.
Components Required
- ESP32
- Alcohol Sensor(MQ-3)
Introduction to MQ-3 Alcohol Sensor
The MQ3 alcohol sensor is one of a series of MQ gas sensors that can detect and monitor the presence of alcohol gas in the the surrounding air. It can detect alcohol gas concentrations ranging from 25 to 500ppm in the air.
Pinout of MQ-3 Alcohol Sensor

| Pin Name | Pin Description |
| VCC | Power Supply (3V to 6V) |
| GND | Ground Pin |
| D0 | Digital Output Pin |
| A0 | Analog Output Pin |
Circuit Diagram Of ESP32 Project:Alcohol Sensor Web Server
This is a circuit diagram of circuit diagram of ESP32 with alcohol sensor.
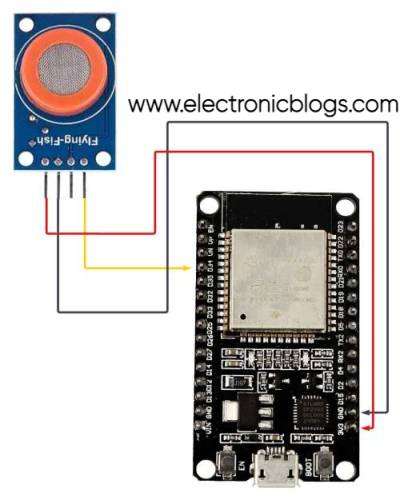
| Knock Sensor Pin | ESP32 Pin |
| VCC | 3V3 Pin |
| GND | GND of ESP32 |
| A0 | GPIO34 |
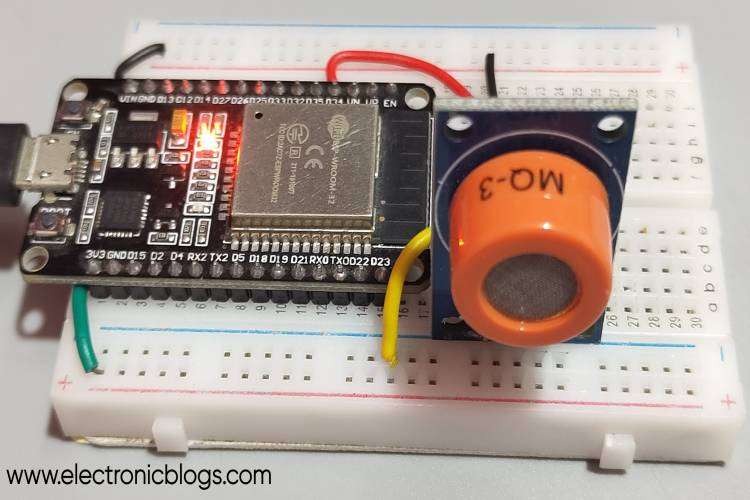
Physical Connection Of ESP32 Project: Alcohol Sensor Web Server
This is a physical connection image of Alcohol sensor with ESP32.
Program/Code:
You can copy this code directly in your IDE.
#include <WiFi.h>
#include <AsyncTCP.h>
#include <ESPAsyncWebServer.h>

const char* ssid = "SSID";
const char* password = "PASSWORD";

const int analogPin = 34;   // Analog pin to read alcohol sensor value
const int ledPin = 13;      // Built-in LED on GPIO13

int alcoholValue = 0;

AsyncWebServer server(80);

void setup() {
  pinMode(ledPin, OUTPUT);

  // Connect to Wi-Fi
  Serial.begin(115200);
  WiFi.begin(ssid, password);
  while (WiFi.status() != WL_CONNECTED) {
    delay(1000);
    Serial.println("Connecting to WiFi...");
  }
  Serial.println("Connected to WiFi");

  // Print ESP32 IP address to Serial Monitor
  Serial.print("ESP32 IP address: ");
  Serial.println(WiFi.localIP());

  // Route for the web interface
  server.on("/", HTTP_GET, [](AsyncWebServerRequest *request){
    String statusColor;
    if (alcoholValue < 100) {
      statusColor = "green";
    } else if (alcoholValue < 400) {
      statusColor = "orange";
    } else {
      statusColor = "red";
    }

    String html = "<html><head><style> \
                  .container { \
                    text-align: center; \
                  } \
                  .status-box { \
                    width: 200px; \
                    height: 100px; \
                    background-color: " + statusColor + "; \
                    text-align: center; \
                    margin: 0 auto; \
                    padding: 20px; \
                    color: white; \
                    font-size: 20px; \
                  } \
                  </style><script> \
                  function updateStatus() { \
                    var xhr = new XMLHttpRequest(); \
                    xhr.onreadystatechange = function() { \
                      if (xhr.readyState == 4 && xhr.status == 200) { \
                        document.getElementById('status').innerHTML = xhr.responseText; \
                      } \
                    }; \
                    xhr.open('GET', '/status', true); \
                    xhr.send(); \
                  } \
                  setInterval(updateStatus, 1000); \
                  </script></head><body> \
                  <div class='container'> \
                    <h1>Alcohol Sensor Status</h1> \
                    <div class='status-box' id='status'>" + alcoholValue + "</div> \
                  </div> \
                  </body></html>";
    request->send(200, "text/html", html);
  });

  // Route to check alcohol sensor status
  server.on("/status", HTTP_GET, [](AsyncWebServerRequest *request){
    String statusColor;
    if (alcoholValue < 100) {
      statusColor = "green";
    } else if (alcoholValue < 400) {
      statusColor = "orange";
    } else {
      statusColor = "red";
    }

    String status = "<div style='background-color: " + statusColor + "; padding: 10px;'>" + "Alcohol Value: " + alcoholValue + "</div>";
    request->send(200, "text/html", status);
  });

  // Start server
  server.begin();

  Serial.println("Server started");
}

void loop() {
  // Simulate reading from an alcohol sensor (replace with your actual sensor code)
  alcoholValue = analogRead(analogPin);

  // Simulate LED indicator based on the alcohol value (replace with your actual logic)
  if (alcoholValue >= 400) {
    digitalWrite(ledPin, HIGH);
  } else {
    digitalWrite(ledPin, LOW);
  }

  delay(1000);  // Adjust the delay as needed
}
Program Explanation
Library Inclusions:
#include <WiFi.h>
#include <AsyncTCP.h>
#include <ESPAsyncWebServer.h>
These lines include Wi-Fi communication libraries as well as asynchronous web server functions.
Network Configuration:
const char* ssid = "SSID";
const char* password = "PASSWORD";
These lines configure the ESP32’s network credentials (SSID and password) for connecting to a Wi-Fi network.
Pin Definitions:
const int analogPin = 34;   // Analog pin to read alcohol sensor value
const int ledPin = 13;      // Built-in LED on GPIO13
These lines define the GPIO pins that are used to read the alcohol sensor (analogPin) and control the LED (ledPin).
Variable Initialization:
int alcoholValue = 0;This variable stores the alcohol level read from the sensor.
Server Initialization:
AsyncWebServer server(80);This line configures the web server object to listen on port 80 for HTTP requests.
Setup Function:
void setup() {
  pinMode(ledPin, OUTPUT);

  // Connect to Wi-Fi
  Serial.begin(115200);
  WiFi.begin(ssid, password);
  while (WiFi.status() != WL_CONNECTED) {
    delay(1000);
    Serial.println("Connecting to WiFi...");
  }
  Serial.println("Connected to WiFi");

  // Print ESP32 IP address to Serial Monitor
  Serial.print("ESP32 IP address: ");
  Serial.println(WiFi.localIP());

  // Route for the web interface
  server.on("/", HTTP_GET, [](AsyncWebServerRequest *request){
    String statusColor;
    if (alcoholValue < 100) {
      statusColor = "green";
    } else if (alcoholValue < 400) {
      statusColor = "orange";
    } else {
      statusColor = "red";
    }

    String html = "<html><head><style> \
                  .container { \
                    text-align: center; \
                  } \
                  .status-box { \
                    width: 200px; \
                    height: 100px; \
                    background-color: " + statusColor + "; \
                    text-align: center; \
                    margin: 0 auto; \
                    padding: 20px; \
                    color: white; \
                    font-size: 20px; \
                  } \
                  </style><script> \
                  function updateStatus() { \
                    var xhr = new XMLHttpRequest(); \
                    xhr.onreadystatechange = function() { \
                      if (xhr.readyState == 4 && xhr.status == 200) { \
                        document.getElementById('status').innerHTML = xhr.responseText; \
                      } \
                    }; \
                    xhr.open('GET', '/status', true); \
                    xhr.send(); \
                  } \
                  setInterval(updateStatus, 1000); \
                  </script></head><body> \
                  <div class='container'> \
                    <h1>Alcohol Sensor Status</h1> \
                    <div class='status-box' id='status'>" + alcoholValue + "</div> \
                  </div> \
                  </body></html>";
    request->send(200, "text/html", html);
  });

  // Route to check alcohol sensor status
  server.on("/status", HTTP_GET, [](AsyncWebServerRequest *request){
    String statusColor;
    if (alcoholValue < 100) {
      statusColor = "green";
    } else if (alcoholValue < 400) {
      statusColor = "orange";
    } else {
      statusColor = "red";
    }

    String status = "<div style='background-color: " + statusColor + "; padding: 10px;'>" + "Alcohol Value: " + alcoholValue + "</div>";
    request->send(200, "text/html", status);
  });

  // Start server
  server.begin();

  Serial.println("Server started");
}
The setup() function contains the initial configuration and setup steps.
- LED Pin Configuration: Sets ledPin as an output for controlling the LED.
- Wi-Fi Connection: Starts serial communication, connects to the selected Wi-Fi network, and waits for it to establish. The IP address of the ESP32 is then printed.
- Web Interface Setup: Defines web interface routes using the ESPAsyncWebServer module. It generates an HTML website that displays the status of the alcohol sensor, with colour coding dependent on alcohol levels.
- Server Start: Starts the web server and prints a “Server started” message to the Serial Monitor.
Loop Function:
void loop() {
  // Simulate reading from an alcohol sensor (replace with your actual sensor code)
  alcoholValue = analogRead(analogPin);

  // Simulate LED indicator based on the alcohol value (replace with your actual logic)
  if (alcoholValue >= 400) {
    digitalWrite(ledPin, HIGH);
  } else {
    digitalWrite(ledPin, LOW);
  }

  delay(1000);  // Adjust the delay as needed
}
The loop() function handles continuous operations.
- Alcohol Sensor Emulation: Uses the analogRead() method to simulate readings from an alcohol sensor. The result received is saved in the alcoholValue variable.
- LED Indicator Emulation: When the alcohol value is greater than or equal to 400, the LED (controlled by ledPin) lights.
- Delay: Adds a 1-second (1000 ms) delay to the loop’s execution speed. You can modify the delay as needed.
Conclusion
In summary, this project uses an ESP32 and an alcohol sensor to build a local web server for monitoring alcohol levels in real time. It provides an easy way to track alcohol levels, encouraging responsible drinking. In future articles will see more ESP32 project.